Mold inspection and acceptance
First, the purpose
In order to ensure that
plastic molds can produce qualified products, they can be put into production normally to ensure the production life of plastic molds and meet the production and use requirements of product design. The specification recognizes the standards of molds in terms of product quality, mold structure, injection molding process requirements, etc., and evaluates mold quality based on this, and through training, understands the trial process and precautions of plastic molds
Two: steps
1. First, through the understanding of the following materials, familiarize yourself with the trial process and key precautions during the trial process.
2. Learn about the actual mold trial process by going to the trial site for practice.
3. Inspect the appearance of the mold, mold material, pouring system, support mold, reset, insert core, take part, exhaust, water transportation system, injection molding process molding system, product appearance, size, and function for acceptance.
Three: As a mold acceptance party, things should be clear before and during mold trial.
Before tryout:
(1) In the mold design stage: When communicating with the mold manufacturer in technical communication, confirm the applicable machine of the mold, the capacity requirements, whether to use the automatic production method, the mold life requirements, the shrinkage rate setting of the product material, and the mold structure ( (Judged according to the mold's glue feeding method), the design of the PL line.
For important appearance parts, the mold manufacturer is also required to conduct mold flow analysis to better predict and evaluate the possible defects of the mold in production.
(2) Mold manufacturing is completed, before the first mold trial
Confirm whether the mold has a reinforced protection device (such as whether there is a forced retreat mechanism, or a thimble plate limit switch mechanism, these mechanisms are all devices that ensure that the mold is not damaged under abnormal conditions)
Confirm whether the ejection and retraction mechanism of the mold is installed
The common ejection and retreat mechanisms are the tie rod mechanism (whether the tie rods are balanced, the number of tie rods is not enough, it must be confirmed) and the cylinder mechanism, sometimes there will be air-assisted ejection assistance, because the nozzle needle is Z-shaped to pull Stay at the cold material level (it is found that there are often nozzle sticking molds in the sixth workshop) *The end of the return rod is flat and there is no spot welding. No gasket at the bottom of the embryo head, spot welding.
All the molds that make the slider should have an oil groove where the slider moves
After the mold is installed on the injection molding machine, do not rush to adjust the injection mold immediately. Instead, ask the technician Fu to set the injection molding machine in the manual operation position, and ask the technician to manually perform each action of the mold.
include:
1. The ejector pin is ejected (to determine whether the ejection is smooth and balanced, whether the position is sufficient for the product to fall off, and whether there is an abnormal friction sound)
2. Reset the thimble (whether the thimble can be returned to the position, if not, it will cause damage to the film cavity of the front mold, it should be checked in time before proceeding to the next step)
3. Whether the thimble is installed in a limited position, and whether the slider can slide into place.
4. Whether the mold can be closed and opened normally.
After the above preliminary work is confirmed, the mold can be adjusted.
In addition, in addition to the size and appearance of the sample itself, it must also be combined with an overall assembly confirmation. Therefore, every time you try a mold, you have to bring all the assembly parts as much as possible. The overall assembly confirmation can have a more direct understanding of the assembly problems existing in the trial product. In addition, for the existing assembly problems, it is more convenient to analyze and modify the plan. It can avoid complexity and simplify, saving time . The acceptance of the mold, the new mold before the test and the brief introduction of the test process are as follows.
1. Make sure that all the problem points have been solved, and on the designated machine, there is no problem after a certain amount of normal production (such as 5000 beer)
2.Clarify the vulnerable parts of the mold, and require the mold shop to provide spare parts for the vulnerable parts to prevent the damage of the vulnerable parts during production from affecting the production.
3. It is required to apply anti-rust paint to the exposed part of the mold, and to make the name of the mold.
4. No defects are allowed on the product surface: lack of material, burnt, top white, material flower, burr, blistering, whitening (cracking, breaking), shrinkage, snake pattern.
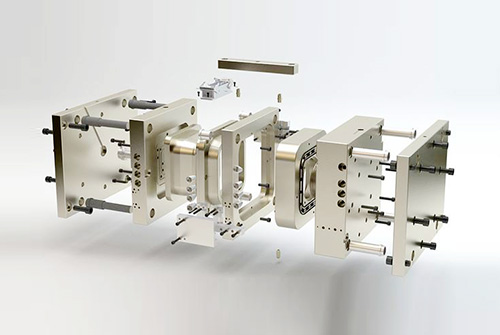
2. Mold appearance
1. The name of the mold is complete with clear characters and neat arrangement.
2. The cooling water nozzle should not protrude from the surface of the mold base.
3. The cooling water nozzle should have entry and exit marks.
4. Mark English characters and numbers should be greater than 5/6, and the position should be about 10mm from the tap. The handwriting should be clear, beautiful, neat, and evenly spaced.
5. Mold accessories should not affect the lifting and storage of the mold. During installation, there are exposed oil cylinders, faucets, pre-reset mechanism, etc., which should be protected by supporting legs.
6. The installation of the support leg should be fixed on the mold base with screws passing through the support leg, and the excessively long support leg is fastened on the mold base by processing the external threaded column.
7. The size of the ejector hole of the mold should meet the requirements of the specified injection molding machine. Except for small molds, one center cannot be used for ejection.
8. The positioning ring should be fixed and reliable. The diameter of the ring is 100mm and 250mm. The positioning ring is 10-20mm higher than the bottom plate. Unless otherwise requested.
9. The external dimensions of the mold should meet the requirements of the designated injection molding machine.
10. The installation direction of the mold with direction requirements should be marked with an arrow on the front template or the rear template.
11. The surface of the mold base should not have pits, rust marks, redundant rings, water vapor in and out, oil holes, etc., and defects that affect the appearance.
12. The mold should be convenient for hoisting and transportation. Mould parts must not be disassembled during hoisting, and the hoisting ring must not interfere with the water nozzle, cylinder, pre-reset rod, etc.
Three, eject, reset, pull out the core, take out
1. The ejection should be smooth, without jamming, and without abnormal sound.
2. The inclined top surface should be polished, and the inclined top surface is lower than the core surface.
3. The sliding parts should be provided with oil grooves, and the surface should be nitrided.
4. All ejector rods should have stop rotation positioning, and each ejector rod should be numbered.
5. The ejection distance should be limited by a limit block.
6. Standard parts should be used for the return spring, and both ends of the spring should not be polished or cut.
7. The slider and core pull should have a stroke limit, and the small slider is limited by a spring. If the spring is inconvenient to install, a corrugated screw can be used. The cylinder core must have a travel switch.
8. Generally, the inclined guide post is used for core pulling of the slider. The angle of the inclined guide post should be 2°~3° smaller than the angle of the locking surface of the slider. If the stroke of the slider is too long, the oil cylinder should be used for drawing.
9. There should be a wear-resistant plate under the large slider with a slider width of more than 150 mm, which is 0.05~0.1 mm higher than the large surface, and an oil groove should be opened.
10. The ejector rod should not move up and down.
11. If barbs are added to the top rod, the direction of the barbs should be consistent, and the barbs are easy to remove from the product.
12. The matching gap between the ejector pin hole and ejector pin, the length of the sealing section, and the surface roughness of the ejector pin hole should be in accordance with the standard requirements.
13. When the product is ejected, it is easy to follow the inclined top, and the top rod should be grooved or etched.
14. The end face of the return rod is flat and there is no spot welding. There is no gasket at the bottom of the embryo head, spot welding.
15. The gate plate of the three-plate mold slides smoothly, and the gate plate is easy to open.
16. Three-plate mold limit rods should be arranged on both sides of the mold installation direction, or pull plates should be added to the mold base to prevent the limit rods from interfering with the operator.
17. The oil circuit and air passage should be smooth, and the hydraulic ejector reset should be in place. 18. The bottom of the guide sleeve should have an exhaust port.
Four, cooling and heating system
1. The cooling or heating system should be fully unblocked.
2. The sealing should be reliable, and the system should not leak under the pressure of 0.5MPa, which is easy to repair.
3. The size and shape of the sealing groove opened on the mold base should meet the requirements of relevant standards.
4. Grease should be applied to the sealing ring when it is installed, and it should be higher than the surface of the mold base after installation.
5. Water and oil flow channel separators should be made of materials that are not easily corroded.
6. The front and back molds should use centralized water supply.
Five, pouring system
1. The gate setting should not affect the appearance of the product and satisfy the product assembly.
2. The runner section and length should be designed reasonably, and the process should be shortened as much as possible under the premise of ensuring the forming quality, and the cross-sectional area should be reduced to shorten the filling and cooling time. At the same time, the plastic loss of the pouring system should be the least.
3. The partial cross section of the three-plate mold runner at the back of the front mold plate should be trapezoidal or semicircular.
4. The three-plate mold is on the gate plate. The diameter of the gate entrance should be less than 3 mm. There is a 3 mm deep step recessed into the gate plate at the ball head.
5. Gates and runners should be machined according to the size requirements of the drawings. Grinding and machining are not allowed.
6. The point gate gate should be in accordance with the specifications.
7. There should be an extension at the front end of the runner as a cold slug hole.
8. The Z-shaped inverted buckle of the pull rod should have a smooth transition.
9. The runner on the parting surface should be round, and the front and rear molds cannot be misaligned.
10. The latent gate on the ejector rod should have no surface shrinkage.
11. The diameter and depth of the cold material cavity for transparent products should meet the design standards.
12. The sprue is easy to remove, the appearance of the product has no trace of gate, and there is no residual sprue at the product assembly.
13. With curved hook latent gate, the two inserts should be nitrided.
Six, forming part, parting surface, exhaust groove
1. There should be no unevenness, pits, rust and other defects affecting the appearance of the front and rear mold surfaces.
2. The parting surface is kept clean and tidy, and there is no depression in the sealing part.
3. The depth of the cutting surface of the exhaust groove should be less than the overflow value of the plastic, and the air groove can be deepened at about 10mm from the cutting surface.
4. The inserts are matched in place for smooth placement and reliable positioning.
5. The inserts, inserts, etc. should be reliably positioned and fixed, the round pieces should be prevented from rotating, and no copper or iron sheets should be placed under the inserts.
6. The end face of the ejector rod is consistent with the core.
7. The forming part of the front and rear molds has no defects such as undercuts and chamfers.
8. For products of multi-cavity molds, the left and right parts are symmetrical, and L or R should be indicated. If the position and size are required, they should meet the requirements. Generally, add them where they do not affect the appearance and assembly.
9. The locking surface of the mold base (flying mold) should be in place, and more than 75% of the area should be touched.
10. The ejector rod should be arranged closer to the side wall and beside the ribs and bosses, and a larger ejector rod should be used.
11. For the same parts, the numbers 1, 2, 3, etc. should be indicated for distinguishing.
12. Each contact surface, insertion surface, and parting surface should be fitted with a test fit (flying mold) in place.
13. The parting surface sealing part should meet the design standards.
14. Skin texture and sandblasting should meet the requirements evenly.
15. For products with requirements for appearance, the screws on the products should have anti-shrink measures.
16. The front mold is inserted into the rear mold or the rear mold is inserted into the front mold. The surroundings should be locked with inclined surfaces and machined to avoid air.
Seven, injection molding production process
1. The mold should have the stability of injection molding production and the repeatability of process parameter adjustment within the range of normal injection molding process conditions.
2. The injection pressure during mold injection production should generally be less than 85% of the injection molding machine's rated maximum injection pressure.
3. The injection speed during the injection molding production of the mold, the injection speed of the three-quarter stroke is not less than 10% of the rated maximum injection speed or more than 90% of the rated maximum injection speed.
4. The holding pressure during injection molding production should generally be less than 85% of the actual maximum injection pressure.
5. The clamping force during injection molding production should be less than 90% of the rated clamping force of the applicable model.
6. In the process of injection molding, the product and nozzle material should be taken out easily and safely (the time is generally no more than 3 seconds each).
7. For molds with inserts, the inserts are easy to install and the inserts are fixed reliably during production.

 skype
skype